Wednesday 28 November 2012

Progress........

This is the two embroidered waist fronts that I bought from a wonman on Etsy a while back. They were a bit grey with some spots. I took a huge risk and put them in the washing machine. They are 100% linen, that's why I did it. Looking good :)

To make sure that the waist would be big enough for me, I added a piece of linen on both front parts. They are hidde behind the old fabric. The old ones didn't have any button wholes, only traces after snaps, so that's what I used as well.

I don't have a pattern for a victorian polonaise with skirt, so I'm playing around and testing my ideas. Not sure what to do from here.......

This hat has been in the making since June this year. I still need something on the edge to hide the wire. I think it's looking really good on me.

Tried to take pictures from the behind while I had it on but that was not an easy task. I used this blue ribbon and ivory lace to make it suitable for a walking suit I'm going to make in royal blue corderoy. Where can I find hat boxes for my hats that don't empty my wallet?

Thursday 1 November 2012

#E336 Ladies Princess Slip

 This pattern calls for some strange ways of stitching together the different pieces.

If you don't want to make these seams, just work it as a mittered corner instead. Fairly easy to do it that way even though this way isn't that much more difficult. You might get a glimpse of what I mean in the picture below.
To insert lace isn't that diificult either. Where the difficulty lies, is when you are cutting (clipping) away the fabric behind the lace so you don't cut into the lace itself. When that is done you can choose between a machine seam or a hand sewn seam. When you use the machine, the stitches are tighter together and makes the whole thing a bit stiffer compared to hand sewing. Make a choice.

 
As usual I used what fabric I had at hand. Of course it wasn't enough for the whole flounce but needed to stitch together several pieces to make it long enough.
 
 Then I added the insert lace and it was not the same as the one I used on the slip. Who's gonna tell?
 
 If you study this picture carefully you will see that I din't use the same fabric for every piece. But it doesn't look bad because I mixed them up in a balanced way.
 
Here's the slip over the chemisse, half way there. 
 
I used a shiny dotted tie around the neck of the slip. I stitched it down on the back and was thinking of a permanent bow in the front. I might change my mind later.

As part of the project I will conclude with the VPLL Checklist
  1. Pattern Name Princess Slip E0336
  2. Sewer’s Skill Level I think this is experiensed pattern in difficulty due to the princess seams.
  3. Pattern Rating (1-5) I loved it. 5
  4. Skill Level An experiensed skill level is needed with regard to pattern adjustments for fit and the lace insertion techniques. A guided beginner will manage this with a slower progress.
  5. Were the instructions easy to follow? Generally speaking the instructions were easy to follow. I think less experienced sewers would benefit from more explanation on the lace insertion placement.
  6. How was the fit/sizing? Pattern size was as described. As noted by other testers the center front pattern piece is a bit wide (2 inches in my case) through the bust area. See posts for more detail.
  7. Did you make any pattern alterations? I made a few alterations regarding the lace insert at the arm opening. Left those out. Made the armpit bigger and used a narrower lace. I also altered the pattern regarding size. I'm a bust 42 inch and had to add on the front and back side pieces. Left the front and back middle parts as they were. Added insert lace to the two back seams as well.
  8. Other notes: The artist drawing of the garment as a longer leaner line than the results using the pattern. Construction is time intensive; this is definitely not a quick sew garment.

This pattern it the Princess Slip vpll pattern #E0336 from March 24. 1912 edition of La Mode Illustree.

My skill level:
I consider myself an Intermediate to Advanced home sewer. Self taught.

Sewing Level Required/appropriate for This Pattern:
This is a pattern suitable for an experienced sewer or an aided beginner. Maybe during class. The techniques are not very difficult when the directions are clear and with figures/pictures added. This goes for the closure at the back as well.

Pattern Rating:
I rate this as a 5 and might use it again later on as a dress pattern.

Description of Pattern:
The slip is very feminine floor length garment with princess seams that are very flattering for the body. It has insert lace down the the centre, over the princess seams in the front, across the bustline and upper bodice. It has eyelet trim gathered with ribbon around the armwholes and neckline. The neckline is finished with lace trim. It would originally have been made in white batiste with white insertion lace.

Description of Fit/Pattern Sizing
The pattern is for a 36 inch bust and I am a 42, so I needed to add a few extra inches.The pdf pattern prints in the correct size if you choose the right one. There are several to chose between depending if you are in America or in Europe. I'm 5 foot 9 and didn't have to alter the waist in any way. The gathered eyelet was necessary to keep it from gaping at the neckline. Since I didn't use the eyelet trim around the armwholes, they were as big as I wanted them to be.

Description of Alterations made to the pattern for fit:
I added 1 1/2 inch to each of the sidepanel front and back. Added 3 inch to the length by using a very narrow hem seam and a wider lace than asked for.

Description of changes I'd like in the pattern:
This one may be used for a lovely dress as well and for the modern sewer it might be nice to have a back or side zipper.

Instructions/Changes to the instructions:
The layout and printing guide was clear, and the instructions were easy to follow. To make this useful to as many sewers as possible, there ought to be more diagrams and figures added to the text. Make the flounce first and hem stitch it.
Finish the front and back before the two parts are being stitched together and the flounce added.
Then I added bias strips to the neck and armholes for strenght. I added the ribbon in the eyelet for last.

Finished garment, fabric, trim:
I used what I had in my stash: white cotto fabric, white/ivory cotton lace, cotton eyelet trim, silk dotted ribbon.
I had some old looking buttons that were perfect in size and added those.

Description of techniques:
I love the insertion lace and plan to use this technique again as I have before. Perhaps on a blouse. It is very straight forward and not difficult. It needs you to be careful and not doing this in a haste.
Using eyelet lace with ribbon to gather the neckline and armholes was a very effective technique for ensuring a good fit.

Would you Recommend this to Others?:
I would recommend this to any practical sewer who is looking for a pattern to make a pretty dress or nightgown they could wear.

Did It Look Like the Illustration When Completed?
I am 5 foot 9 tall, but even I didn't get as slim as the drawing. But that is only to be expected as every pattern has very slim line drawings to illustrate the pattern. But the finished slip looks as good as expected so that aspect of the illustration was accurate.

Other Notes:
Being part of the group has been a great motivator to get me back into sewing garments again. It is very inspiring to see what others do with the pattern. There are so many wonderful variations on this patern it's worth taking a look through them all!


Wednesday 24 October 2012

It's hard to chose....


.... and while I try to figure out what to do, I'm stitching away on the princess slip. All I have to do is adding the flounceat the buttom, lace around the armpits and the buttonhole lace around the neck.

Since I didn't have enough of the same lace, I take a piece of this and a pice of that. Who will know under all the other layers? Layers of this:
The best way to buy fabric is to collect a pice here and there. It won't feel too expencive either. What I want to do with these fabrics is to combine them.
 
Into something like this:
 
Or perhaps one of these:
 
 I just have to keep in mind that I'm not 25 anymore and need to take that into consideration when making my choice. Oh boy..........
 

Saturday 13 October 2012

E 0162 Ladies 1912 Skirt


This is my choice for the skirt. Well, I didn't have much of a choice since I wanted to use some left overs from a real old sewing project.
 
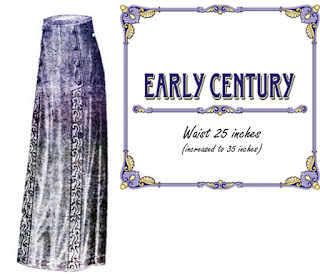
The skirt has a 25 inch waist and that is way off for me. I had to add 9 inch in total, to a 34 inch waist. That way I don't have to tighten the corset too much.
 
Since the wool fabric has no direction or any stretch I could twist and turn the skirt's pattern pieces in any direction to fit on my fabric. A nice way to save on fabric.
 
First I stitched the side incisions.
It's near to impossible to transfer the braid pattern on to the wool.
 
I draw the pattern onto two strips of fine paper, stitched it to the skirt side panel and stitched down the single sided braid I got my hand on. Very few people knows about soutache braid these days :(
 
Removing the paper wasn't too difficult, but there were those tiny twist and turns where the paper were hard to remove. Sooo....I tried something....
 
The water became a little bit easier to remove after I had made it wet and soft. If you have any of those foundations that disapear in water I would recommend them at this stage.
 
Zig Zag around every piece and cut into the seam allowanse before....
 
.....I pressed the seam allowance to the wrong side. At this point you might want to secure them with some big stitches. I didn't do that.
 
I stitched each side panel to the front piece. The pattern wants you to leave the left side open for closure but I did it on the right side. When have I ever done what a pattern tells me to do? :)
 
For a waistband I reused the band you can find on curtains. Just remove the strings.

First I stitch the skirt and the band right sides together. Then I turned the waist band flat out and stitched down the seam allowanse. When the waist band is inside the skirt it will fold easier and stay in place.
 
 When it was time to set in the back piece, I didn't follow the curve in the pieces. Since I don't have a S-curve corset I wanted a straighter look.
 
And here it is. I didn't manage to remove the paper totaly and have to give it a spin in the washing machine.

This is the back view.
 
Pattern Review Checklist:
  1. Description:The Vintage Pattern Lending Library, Ladies Skirt #0162, May 5, 1912
  2. Sizing: Pattern was listed as 25 inch waist and those measurements seem to be correct. I adjusted the pattern for a 34 inch waist, adding 2 inches each to the back and front center panels worked out perfectly, and 2 1/2 inch to each side panels.
  3. Did it look like the photo/drawing on pattern envelope? Yes, but the illustration appeared a bit narrower than the garment pattern pieces. To get what I wanted I stiched the back panel staight down the side of the side panels.
  4. Were the instructions easy to follow? The pattern/fabric layout diagrams showed the front and back panel placed one direction and the side gores placed the other. I made my skirt using 100% felted wool, so while it may not have made a difference, I still opted to place all pieces in the same direction. My fabric was 60 inches wide so there was no additional fabric needed to adjust for the layout. If using directional fabric, you will need to plan for this.
    I chose to stitch a regular 3/8 inch seam, pressed the seam allowance to one side, top stitched close to the seam, and finally top stitched another 1/2 inch in. For the closed side of the front panel I pressed the pieces to make the nice ‘L’ shape, pinned in place, and top stitched it together as above. This may have been what the directions were calling for all along…
  5. What did you particularly like or dislike about the pattern? On a scale of 1 to 5 – this is a FIVE.  I especially loved the soutache trim detail. Although it took a long time to complete, it was very rewarding to follow the 1912 illustration.
  6. Fabric Used – Medium grey 100% felted wool with black poly soutache trim.
  7. Pattern alterations/design changes I made
    I needed an additional 9 inches for the waist which I adjusted by adding 2 inches along the entire front and back center pattern pieces. The hip dart worked out perfectly after the adjustment, but I probably should have added 1 inch to all the pieces as I would have liked the button detail to have been a little closer to center. I also increased the side.
  8. In conclusion, this was a fun pattern and I loved the soutache detail. I’m not sure I would recommend this to a beginner, but for the intermediate to more advanced sewer, it’s a beautiful skirt. It was so interesting to see everyone’s take on the soutache trim detail.
  9.  
VPLL Checklist:
  1. Ladies 1912 Skirt  #0162, sized for 25 inch waist.
  2. My sewing level is advanced. This is clearly intended for a slender young woman in a corset!   This pattern needed to be enlarged. Total added to waist was 9”,
  3. The skirt is not as narrow as illustrated. However, I love the skirt, and give it a 5! Its construction is straightforward and clever.
  4. With instructions, this could be put together by someone with intermediate sewing skills. Possibly even elementary skills
  5. There were some instructions to follow and they were quite straight forward.
  6. I used a light felted wool fabric purchased at an estate sale. I used a single poly braid for the pattern on the front and I needed in tatal 10 yards of it.
  7. Because I am 5’9” and the skirt was looking to be long enough for me. No alterations needed.  I made alterations to the pattern for fit, and one small alterations to the design.
  8. I would definitely recommend this pattern.

Saturday 8 September 2012

Here I am.........

.....with the Afternoon wrap....

....E0335 Ladies blouse..........

.......the E0200 Skirt with scallops....
and a strawhat made of paper (in China) covered with fabric, lace and roses. Alovely complete outfit anno 1912. I didn't use my chemise or corset this time.

Sunday 2 September 2012

E0291 Ladies Afternoon Wrap, 1912

As usual Duke knows exactly what to do when I lay something down on the floor to work with is. This time the pattern for the the ladies wrap....
 
The Pattern is said to be for a 32 inch bust and I'm about 42 so...
.....I had to add a few more. But I didn't size it up to a full 42 inch I think. Maybe about 40 or so. Not that important on this garment for me since I'm not a big busted woman.

Here's the pieces for the outside of the wrap. I didn't take into account bias or no bias on this since there's none in the fabric and it has a lovely drape to it. I think it is a matt satin fabric of some sort. It's a leftover piece that I bought several years ago and I don't remmember exactly.

But it's an other matter with the cotton lining. As you can see I had to split the pattern in two to even place the pattern pieces on the fabric. This time I had to make sure that the front and back was on the straight grain and the "arms" were as much on the bias as I could get them. It worked :)

Here I have stiched the pieces together and it's not that easy to spot the seam line.

Well, do you? :)

I made tassels out of black and red DMC embroidery thread. To make them a bit heavier I added some bling.

The bling is ticked inside, I've stiched all the sides together. Just a small opening in the back to turn the whole thing inside - out.

Just before everything is turned.......

I need to press the seams to make it drape more precise. The back/side.

The front. This is not the finished belt, yet :)

The tassels.

Here you can see the lining. One day I hope to find someone to take pictures of me dressed up in my 1912 garments :) 


Pattern Description/Sizing
Vintage Pattern Lending Library, Ladies Afternoon Wrap #0291, Size 32 inch Bust

Did it look like the photo/drawing on pattern envelope?
It actually did  It drapes beautifully.

Were the instructions easy to follow?
Sorry, I never read them........

What did I particularly like or dislike about the pattern?
On a scale of 1-5, I would give this pattern a FIVE – I loved the drape, and depending upon belt and tassel options, it can be made to suit formal attire or dress up a pair of jeans for a night out. It’s deceivingly versatile.

Fabric used – a heavier satin and light cotton for the lining. To avoid the wrap to slip down from my shoulders.

Pattern alterations/design changes.
Although I am a larger bust than the 32′ stated in the pattern, the dart placement worked out fine for me. Very forgivable design. The only adjustment I made was to elongate the front and back sections by about 3 inches.

Would I recommend this to others?
Absolutely! Especially for someone wanting a simply elegant piece to dress up an outfit, or a wonderful canvas for an ‘art to wear’ project. I think with a bit more clarification regarding some directions, this can be a great beginner pattern.

In conclusion – Would I sew this again…. yes, but definitely with a different fabric.